.jpg)


D365 Hacks: Custom Lookups

You got the Dynamics 365 project. The requirements are clear. More or less. In modern enterprise solutions, it is quite common to have a rich data model with a lot of different tables entwined with each other in various ways. Which naturally creates lookups in forms. This creates connections between records giving the opportunity for a 360-degree view of your customers, leads, opportunities, projects etc.

Or in my geeky case of the Avenge 365 app based on Dynamics 365 Sales, a 360-degree view of the battles the Avengers fight to protect cities from supervillains.
But alas, lookups can also be misleading and cause some chaos of their own.
Wait, so what is the problem with lookups?
To explain the potential issue, let me paint the picture for you. In the S.H.I.E.L.D. project records of the Avenge 365 app, there is a lookup to connect the project to the most urgent task for the assigned owner to complete.
But what happens when the values are confusing the users? It may be there are similar values across records, incomplete values, or just plain unknown values to the user as they are accustomed to referring to a due date for urgency.

As per below screenshot, the user does not have an easy way of identifying due dates for the most urgent task to be assigned to the project. What this means is either that lookup stays empty or potentially filled in with the wrong value. Either way, not a good outcome!

Similarly, if the Project was embedded in another table through a lookup, a similar thing may occur. In specific, if several projects have similar names, users may also need to see the Project ID or Status before choosing the right record.
So what do you do?

Well, hack the planet of course! Oh wait, no. Wrong movie. This is the movie about how you can hack your way into customizing the lookup values.
Here are some basic concepts and components you need to keep in mind:
The default: In Dynamics 365 and model-driven Power Apps, lookup columns are one of the most common ways to relate records between Dataverse tables. By default, users see the primary name column when selecting a lookup value. That works until the primary name is not enough like in our case.

Lookup view: A lookup view controls which columns appear when users search for and select records in a lookup field. The lookup views define the columns, column order, width, sorting, and filters used to display records.
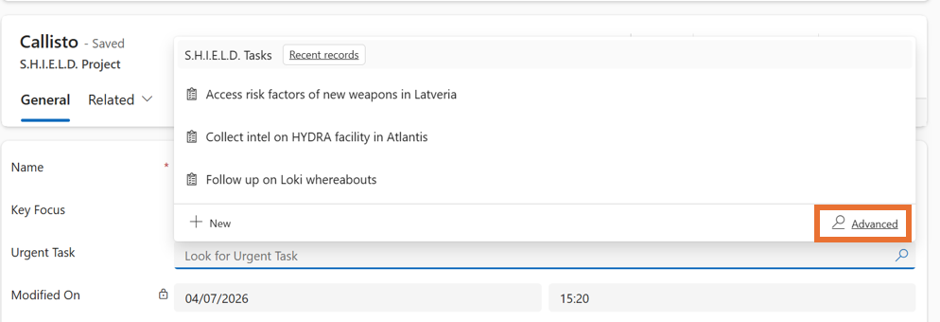
This applies to both what the user will see in the lookup value, but also the view they can explore in depth through the Advanced view.
Now, onto the setup:
Step 1: Open the Referenced Table
Go to Power Apps maker portal and open the solution that contains your table customizations. Open the table being selected in the lookup.
In this example, that is the S.H.I.E.L.D. Task table.
Remember: the lookup view belongs to the table being looked up.
Step 2: Open the Lookup View

Inside the table, go to Views, find the lookup view and open it.
Step 3: Add the Additional Columns

In the view designer, add the other columns you want users to see.
For example:
Due Date: Helpful to define urgency through imminent due dates
Description: Helpful in the Advanced view for what the task actually is about
Step 4: Adjust Column Width and Sorting
Set the column width so the column values are readable.
You may also want to update the default sort order. For example, sorting by Task Subject may be fine, but sorting by Due Date can give users a better experience with the concept of urgency in mind.
Once ready, Save and publish.
Step 5: Test the Lookup
Open your Dynamics 365 (or Model-Driven) app and navigate to the table that uses the lookup.
In our example, open S.H.I.E.L.D. Project, then click the Urgent Task lookup field. Now we see due dates and it is sorted through Due Date ascending, so urgency is clear.

Plus, if you clicked on Advanced, you would also see the Description column for extra clarity.

A few tips to hack this further:
Whatever you want to see as secondary value in the lookup, add is as the first column on the right. In this case, it is Due Date. This will help with defining what is urgent.
However, if the user wants to understand more about each value without opening its underlying record, they can also click on Advanced magnifying lens view, and then they can see the rest of lookup view’s columns such as Description.
Remember, you as a maker have the option to allow users to switch between views or stick with the one you set up. Furthermore, you can allow them to see only a subset of the views even if you are allowing them to switch. So, loads of options for your customization.
This simple configuration change can significantly improve usability, especially when users need to distinguish between records with similar names. No longer do you have to ask people to remember special abbreviations, project codes or random Finance IDs.
Just update your lookup views and enhance your CRM app’s data hygiene in no time!


what if I need a specific lookup for just one other table, not general list but filtered values?