.jpg)


Task Assignment Agent with Adaptive Cards and Power Automate Emails
- Angeliki Patsiavou

- Sep 4, 2025
- 7 min read
Updated: Jan 20
Let’s get agentic AI to do more things for us, they said. It will all be easier, they said. Well, after watching another Parks and Recreation episode, I truly wanted to put this to the test by solving for the perennial CRM problem; delegation and task assignment.

To be perfectly honest, this is a challenge in many business scenarios. Or even personal life! Tasks arise in our head, in a meeting, on the way to work, during a conversation, you name it. Being on the go is always the name of the game, and if only it was that easy to document everything online with minimum effort. Rather frequently, we rely on a piece of paper, a OneNote bullet point, an email, and everything in between to remember.
The struggle ends here.
Treat yourself – with your own task agent!

Yes, yes. The infamous Parks and Recreation line comes to play here.
Instead of having to worry about where, if and how efficiently you will document the next task assigned to you/ a colleague, imagine this. Your agent can very quickly do this for you in a single Adaptive Card action. Whilst documenting and assigning everything.
Let’ summarize the user experience goodness of the agent:
Copilot Studio agent which can be integrated anywhere
Adaptive Card for input of the task’s details incl. the assignee (The only manual end user step)
Power Automate Flow to create CRM app records and assign tasks
Automated Email sent to the assignee as a notification
Some Recreational rabbit holes
Building is not always a ball in the Park. In the below end-to-end guide, you can find some tips and tricks on how to address challenges with:

Power Automate flows to manage variable inputs that are understood differently by the Adaptive Card
Creating a shared mailbox if you do not want it sent from a specific user
Setting up Read And Manage Permissions, Send As Permissions and Send On Behalf Of Permissions
Choosing which dynamic values to add in your automated emails
Let’s start building
Why wait when you can just get building the agent straight away. Here is a step-by-step guide on how to set this agent up, with loads of bonus tips on some of the above challenges.
Step 1: Create a new topic and trigger
Here is where you start creating a new topic in your new (or existing) Copilot Studio agent. In this particular example, you are using classic orchestration and that is why your Trigger is based on specific phrases (otherwise this feature is unavailable as you give the agent a descriptive instruction in the trigger instead).
To keep things simple and predictable for end users, here are some sample phrases to add:

Step 2: Set up the Adaptive Card

In your agent, add a new node and select Ask with adaptive card.
If you would like a refresher on how to generally design Adaptive Cards, here is your ultimate starter blog!
It helps to design in your head/ piece of paper/ slide or elsewhere how you would like the card to look like so you can then build each JSON aspect bit by bit.
Here you can see what the Adaptive Card will look like.
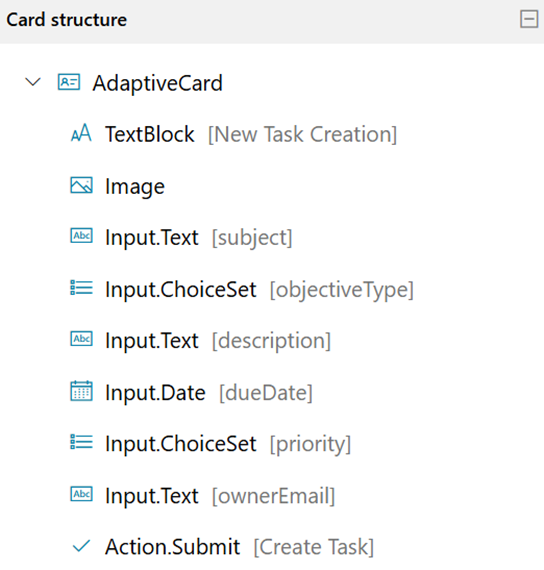
Let’s break it down into 9 different components:

This is TextBlock component you need as a heading
Next up is an Image component to enhance users’ experience
First thing the user fills in is the tasks’ subject line with an Input.Text component
Always helpful to classify the task’s objective type with an Input.ChoiceSet component
For extra details the user can add freely about the task, another Input.Text component
To mark the due date, an Input.Date component which will use a calendar picker
Similarly to marking the objective type, another Input.ChoiceSet will be used to mark the task’s priority
To complete the task assignment, you ask for the assignee’s email with another Input.Text component; that is how the Power Automate flow will find the Dataverse user
Once the user is ready, they can finalize the task’s creation with an Action.Submit button
You can set all this up manually in the Adaptive card designer through the components in the Card structure. The corresponding JSON code will generate in the Card payload editor.

However, if you are curious about getting your hands on the JSON piece for this card, here you go:

Of course, now you have to map the variable inputs from the card’s JSON into variables for the topic.
Some things to point out:
Find your own naming conventions for variables and stick to it, which definitely helps with data hygiene across the board.
The date input from the Adaptive Card will remain a date variable, but the rest will be text variables.

This will clash a bit with the Power Automate flow, but more on that in the next section. Trust the process though, it will be worth it!
Step 3: Transform the date variable into a string one

If you attempt to invoke the Power Automate flow straight away for creating the task record in Dataverse, you will notice an issue in the sense it will not accept the date variable.
To fix it, you first create a new topic node to transform it into a string one. It is all explained in this blog here.
Step 4: Set up the Power Automate flow in the maker portal
This will be an instant kind of flow, and the Copilot Studio Skills trigger will be used. You have to map the Adaptive Card’s inputs as text variables throughout.
As mentioned earlier, and explained here, the flow will force you to map a string rather than a date. Hence the input transformation in the previous step. Whilst this may be a bit inconvenient, have a string version of a date is not a problem as Dataverse will accept it. This is known as the ISO 8601 date string format. Thus, whether you are using a Dynamics 365 CRM/ Model-Driven App, you will be ok!
This is how your flow will look like at the top.

Next part is to find the user with the email address which is meant to be assigned the task. In flow terms, this is a List rows Dataverse action.
Ready for some OData filtering in Filter rows? This is how it will look through the query internalemailaddress eq ‘ownerEmail’ as per the Adaptive Card input. This is so you only find the unique user with that email address (hence the Row count also set to 1).
As a reminder, internalemailaddress is what the User table has set for the user record’s email column by default.

Next action in the flow is to transform the text input (label) for the Objective Type and Priority variables into values the choice column format will understand.
This is why you will use two Compose actions in a row.
For Priority, the expression is the below as we got 3 values for High, Normal and Low items
if(equals(triggerBody()?['text_4'], 'Low'), 0, if(equals(triggerBody()?['text_4'], 'Normal'), 1, 2))
For Objective Type, the expression is the below as we got 4 values for Surprise, Settlement, Upsell and Complaint items
if(equals(triggerBody()?['text_2'], 'Surprise'), 68,if(equals(triggerBody()?['text_2'], 'Settlement'), 69,if(equals(triggerBody()?['text_2'], 'Upsell'), 70, 71)))

Next up, you will add a new action step for Add a new row for Dataverse. This is how you will create the Dataverse task record.
The table name will be the Tasks table, for Subject, Description and Due Date you can map directly the Adaptive Card’s inputs from the Skills trigger.
However, for the Objective Type and Priority columns, add the Compose outputs instead.
The final detail is to assign the task through the Owner column by using the OData Id from the Find user step you did earlier.


Last step is to send an email to notify the assignee through the flow. This is through the Send an email (V2) action for Outlook.
A few things for the set-up:
The To part can be mapped straight into the Adaptive Card’s input for the assignee’s email.
Subject is the subject line for the email, which can either be static or include any dynamic value you wish
In the Body, it is a lot more engaging and informative if you include dynamic values to customize the email. The assignee receiving it will appreciate both the personalization and helpful nature of these details. For example, if an item has been marked as high priority, then they may wish to prioritize it in their workload.
In the From (Send as) part, add the email address the email should come from. In this case, I have added a new shared mailbox I created which has impersonation permissions.

Now, as a refresher, I did promise to demystify the difference for shared mailboxes in the following permissions: Read And Manage Permissions, Send As Permissions and Send On Behalf Of Permissions.
Permission | What you can do | How task assignee recipients see it |
Read And Manage | Open the mailbox, read/manage emails, calendar, folders | N/A (view-only) |
Send As | Send emails as if you are the mailbox | |
Send On Behalf | Send emails on behalf of the mailbox | From: Angeliki on behalf of smarthoteltasks@823p2g.onmicrosoft.com |
Here is an example of how the email will look like in Outlook:

The flow is now complete, so ensure you have saved and published it in the maker portal.
Then, go back to Copilot Studio and the topic.
Step 5: Add an action and invoke the Power Automate flow
Back into the agent’s topic, add a new node through Add a tool and then select the flow you just built. In this case it is called Create a new task.

Remember you should map the date as a string, hence the whole transformation from earlier!


To complete the end user’s experience with the agent, you can add a Message to let them know the record has been created and the assignee has been emailed.

Ready to save now and publish that agent!
Enjoy your automated task assignments.


Comments